Step 1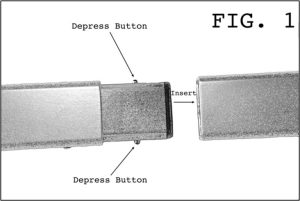
Join the two rail sections of the ski vise by sliding them together on the joiner section. Depress the buttons on the joiner section to slide the opposite rail section onto the joiner section. When properly joined the buttons with click into place in the holes and the rail sections with be joined firmly together.
Step 2
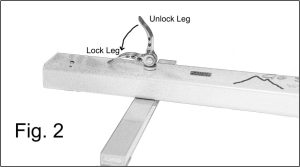
Release the legs by lifting the locking handles toward the ends of the rail sections. Rotate the legs so they are perpendicular to the joined rail sections. Make sure the longer ends of the legs are rotated to one side and the shorter ends to the other. Secure the legs in the perpendicular positions by depressing the locking handle. DO NOT OVER-TIGHTEN. Exerting unnecessary force on the locking handle may damage the threads in the legs or the locking mechanism. The locking mechanism should be snug when closed with just enough pressure to keep the legs in place.
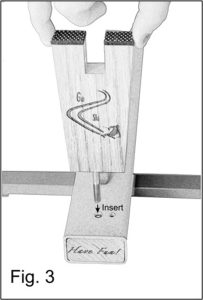 Step 3
Attach the ski support posts by removing the star nuts from the bolts on the posts. Insert the posts into the holes on either end of the joined rail sections. The small nub protruding from the bottom of the support post near the bolt must be inserted in the smaller hole adjacent to the bolt hole to keep the post from rotating while in use. Tighten the star nut onto the bolt on the bottom of the rail sections. DO NOT OVER-TIGHTEN. Finger-tight is sufficient to hold the posts in place while in use. FIG. 3
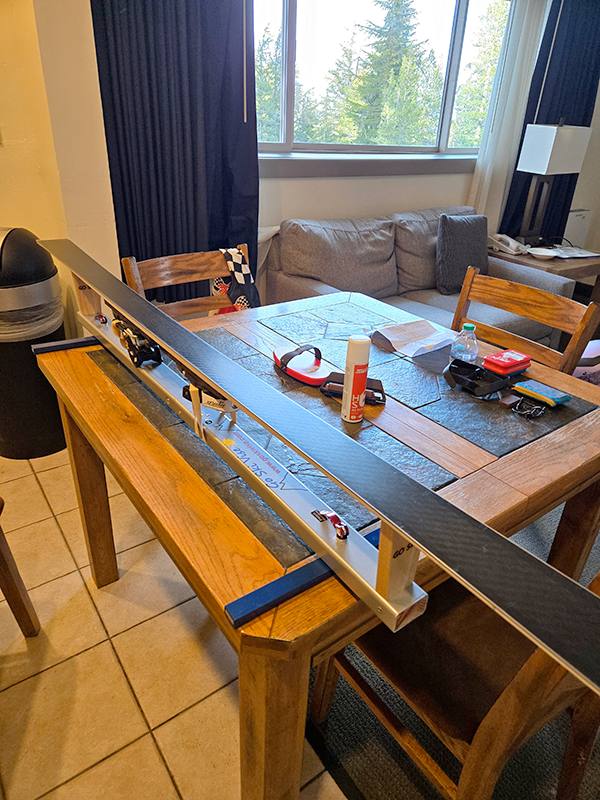
Step 4
For edge tuning, secure the ski brakes against the bindings with the supplied retaining strap (short rubber band). Then place the ski into the slots on the support posts, taking care to center the ski so that equal lengths of the ski protrude from the posts on either end. Orient the binding and the top of the ski toward the longer legs of the ski vise. The base of the ski should face the shorter legs. The ski is now ready for edge tuning. It may be helpful tohold the binding with the hand opposite of that used for filing or stoning the edge for additional stability if desired.
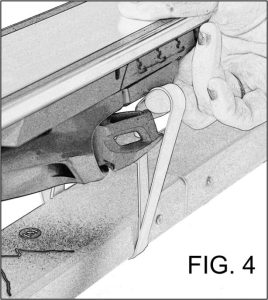
Step 5
For waxing or base work, lay the ski on the non-skid pads on top of the support posts with the base facing upward, so that equal lengths of the ski protrude from the posts on either end. The binding should be in the “open” position. Be sure the ski is centered, end-to-end and side-to-side, on the support posts. Pass the supplied long rubber band under the rail section with a loop protruding on either side. Pull the loops up and secure them around the “wings” on the toe-piece of the binding. FIG. 4
For scraping or brushing wax, be careful to run the tool straight down the base without applying excessive pressure. Aggressive scraping or brushing at an angle to the base may cause the ski to twist on the support posts or completely release from the posts. If your scaping and brushing technique is good, you may not need to secure the ski on the vise with the rubber band.
CAUTION! Using the ski vise improperly by exerting excessive force on components or ski tuning tools may create an unsafe condition resulting in injury including bruises or lacerations. Allowing tuning tools such as files and scrapers to slip off the edge of the ski may also cause injury. ONLY PERSONS KNOWLEDGEABLE IN SKI TUNING SHOULD USE THE SKI VISE.
NOTE: The bag in which the vise is shipped is intended for storage and selected for light weight. If you travel frequently with the vise, a sturdier bag may be required.
Karen K.
Seattle, W.
“Very pleased with ease of set up and stability of the ski on the vise resulting in an easy prep of my skis. It also fits inside a ski tube for travel which was helpful for packing.”